Using VueScan Software on a Nikon Film Scanner
Note 1: The best possible results can only be achieved with clean slides and negatives. Before scanning, remove dust from the film with a blower and wipe the slide or negative gently with a soft, dry cloth to remove fingerprints. We do also have a duster available on request.
Note 2: If you need to scan medium-size negatives (or you need to do a large volume of film in a short time), use the Epson Perfection V700, which is a flatbed with a transparency bed as well. General information on the Epson scanners is found under Flatbed Scanning.
Are you scanning 35 mm slides or negative strips/large-format film?
Scanning 35 mm Slides
The Nikon Coolscan V comes with two different film readers that can be used interchangeably. The slide reader is the one that sits flush with the face of the scanner when inserted. The negative strip reader protrudes from the face of the scanner by about 5 cm. One should be inserted and the other sitting next to the scanner. You may switch the readers as needed. If you are uncomfortable switching readers, ask Lab staff to assist you.
- Turn the scanner on. (The scanner must be on before the scanning software is launched.)
- Determine which side of the slide should be facing up. Film has an emulsion surface and a base; when examined under a light, the emulsion side is dull and the base shiny. Viewed from the base side, the image appears exactly as it would in a printed photograph. We want the base (shiny side) facing up.
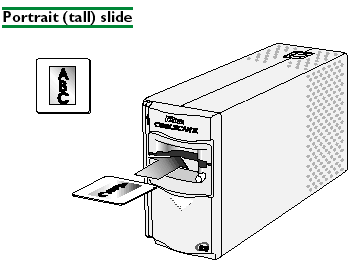
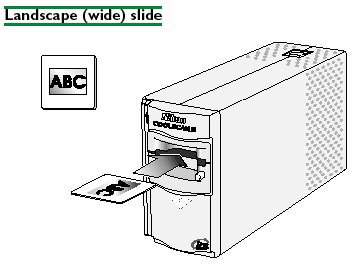
- Insert the slide smoothly into the scanner with the base (shiny side) up and the short side of the aperture facing the scanner (i.e. in portrait orientation). Stop when the slide contacts the back of the slot. The correct orientations for inserting the slides are shown below. (Of course, if you accidentally rotate the slide 180°, you can use the slide scanning software to correct the error.)
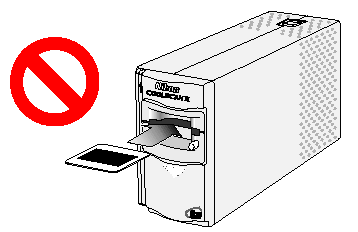
Do not insert the slide with the long side of the aperture facing the scanner (i.e. in landscape orientation). The scanner will be unable to scan the edges of the film.
4. You are ready to launch the VueScan software, which is located in the Applications folder. A simple way to launch the software is by searching for VueScan in Spotlight (triggered by clicking the magnifying glass icon at the top right of the computer screen or by pressing Command-Space).
5. In the top left portion of the VueScan window, you will see a set of control tabs (pictured below). Take time to make sure your settings are correct. If you are an advanced user and want ultimate control, select the Input tab and then choose Professional instead of Standard under Options (at the top of the Input settings list).
6. In the Input tab, specifically, set…
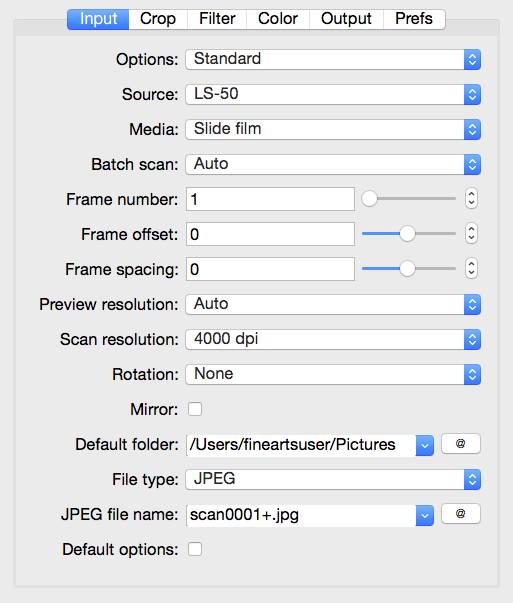
Media to Slide film
Scan resolution to 4000 dpi
This will allow you to print the image, scanned from a full size frame slide or negative, on the following media:
- 13″ by 19″ sheet at best quality
- 24″ roll (by 36″) maximum without significant quality loss and digital manipulation.
Please ask staff about ON1 Resize software if you need to print at larger sizes.
Rotation as necessary (if your slide is Landscape/wide, for example, you may need to select either Left or Right)
7. Skip to the Color tab, and ensure settings are as shown below.
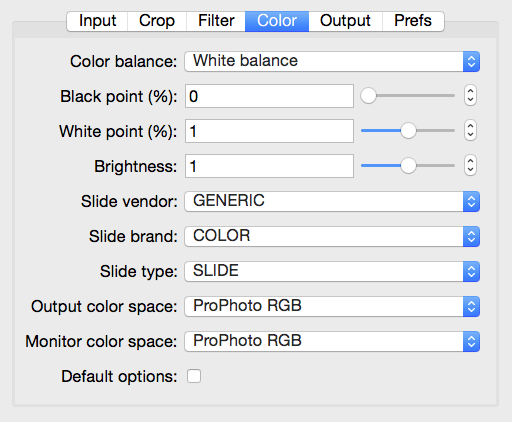
If your film slides are Kodak, select this option from the Slide vendor drop-down list. Choose your Slide brand and Slide type as appropriate. Pay attention, particularly, to these settings:
Printer color space: sRGB (Professional mode only; not pictured)
Output color space: ProPhoto RGB
Monitor color space: ProPhoto RGB
8. While still in the Color tab, press the Preview button at the bottom left of the VueScan screen. Now that you have an image preview to work with:
Check out Color balance options and find the best ones for your image.
9. Press Scan. After the image has scanned, press Preview again. This eliminates a potential bug that crops up on the first scan done after start-up of the program. Now, you can continue to work with your image.
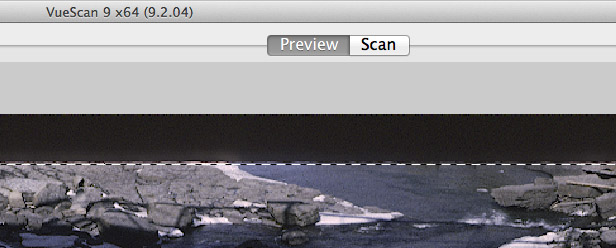
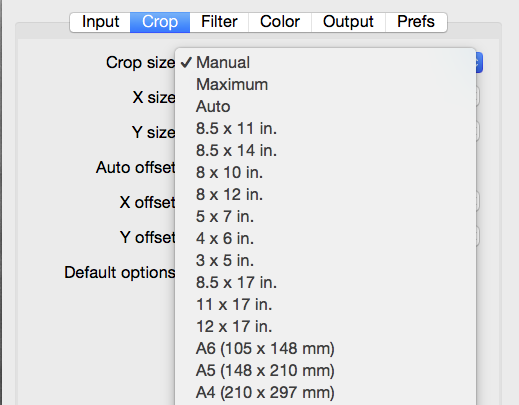
10. Adjust the marquee rectangle to specify the size of your final scan by click-and-dragging the rectangle edges with your mouse. If you want other crop options, you can go to the Crop tab and use the Crop size drop-down menu. It contains pre-set crop size options. Selecting Manual will allow you to adjust the rectangle size by entering X and Y sizes numerically, or click-and-dragging.The resulting rectangle outlines what the scanner will actually capture as your scanned image.

11. In the Filter tab, you may want to check out the results of selecting Infrared clean and Sharpen options.

Below are two image parts for comparison
 |  |
| No Filters | Light infrared clean, Sharpen checked |
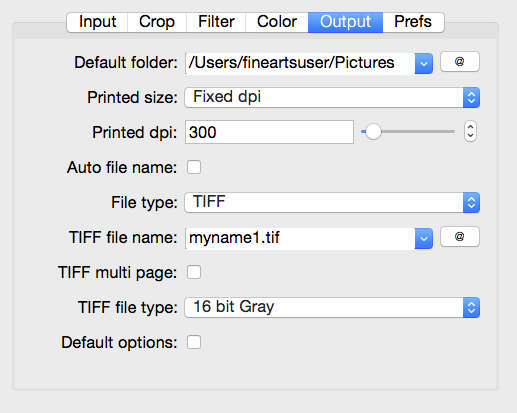
12. Finally, in the Output tab, make sure the options shown below are selected.
Select Fixed dpi under the Printed size drop-down menu.
The Printed dpi option will pop up. Enter 300.
Enter in your preferred file name (instead of “myname1”)
Make sure TIFF file is checked. VueScan is also able to create multiple files of different formats from the same scan when in Professional Mode; just check off the file types you need.
13. Feel free to go back to any of the tabs and adjust your settings as necessary.
If you are looking for more colour adjustment options, click the More button at the bottom of the VueScan screen, and go through each of the tabs again; Color and Input tabs, especially, will have added functionality in this area.
14. Press the Scan button and wait for your image to appear.
15. If you need to re-adjust your crop marks and want the marquee box to come up again, switch to the Preview tab located to the far right of the other tabs, and above the scanned image.
16. Scan again as necessary.
17. Remove your slide by pressing the scanner’s eject button.
18. Insert next slide and repeat steps 5–18 until you have completed all your scanning.
19. Quit the program (VueScan > Quit) when you are done.
Scanning 35 mm Negative Strips
The Nikon Coolscan V comes with two different film readers that can be used interchangeably. The slide reader is the one that sits flush with the face of the scanner when inserted. The negative strip reader protrudes from the face of the scanner by about 5 cm. One should be inserted and the other sitting next to the scanner. You may switch the readers as needed. If you are uncomfortable switching readers, ask Lab staff to assist you.
The large-format Epson Perfection V700 comes with various carriers for film and other transparent media, which are kept beside the scanner. These carriers accommodate sizes larger than 35 mm. Feel free to ask Lab staff for assistance if you are unsure about using these. Information on Epson scanners is found in Flatbed Scanning.
- Turn the scanner on. (The scanner must be on before the scanning software is launched.)
- You are ready to launch the VueScan software. Click on the Launchpad icon in the Dock (on the lower far left) or launch it by searching for VueScan in Spotlight (detective lens at the top right of the computer screen).
- Determine which side of the film should be facing up. Film has an emulsion surface and a base; when examined under a light, the emulsion side is dull and the base shiny. We want the base (shiny side) facing up. Another way to determine this is to insert the film with the curl of it facing down/inward. The reader will automatically draw the strip in.
- In the top left portion of the VueScan window, you will see a set of control tabs (pictured below). Take time to make sure your settings are correct. If you are an advanced user and want ultimate control, select the Input tab and then choose Professional instead of Standard under Options (at the top of the Input settings list).
- In the Input tab, specifically, set…

Media to Color negative or B&W negative, as appropriate.
Scan resolution to 4000 dpi
This will allow you to print the image, scanned from a full size frame slide or negative, on the following media:
- 13″ by 19″ sheet at best quality
- 24″ roll (by 36″) maximum without significant quality loss and digital manipulation.
Please ask staff about ON1 Resize software if you need to print at larger sizes.
Rotation as necessary (if your slide is Landscape/wide, for example, you may need to select either Left or Right)
6. To preview and scan a single frame, enter the Frame number in the Input tab, and make sure Batch scan is set to “Off”. Press Preview.
7. Press Scan. After the image has scanned, press Preview again. This eliminates a potential bug that crops up on the first scan done after start-up of the program. Now, you can continue to work with your image.
8. If you are not doing a batch scan, skip step 9 and continue to step 10.
9. You are able to preview and scan your film strip in batches of frames, though there is no ability to modify any frame settings while a scan is in progress. To set up a batch scan:
Select Batch scan settings (“All” will scan all frames, “List” will allow you to select specific frame numbers)Press the Preview button and wait for the images to appear. You will be able to flip between the frame previews using the arrows at the bottom right of the VueScan screen.Adjust the crop marquee box as necessary on each frame. This will be the area of the final scan.
If you want other crop options, you can go to the Crop tab and use the Crop size drop-down menu. It contains pre-set crop size options. Selecting Manual will allow you to adjust the rectangle size by entering X and Y sizes numerically, or click-and-dragging the crop marks.The resulting rectangle outlines what the scanner will actually capture as your scanned image.
10. Skip to the Color tab, and ensure settings are as shown below.
If you know your film type, select it from the Negative vendor, brand, and typedrop-down lists.
Adjust Color balance options to get the image you want.
Pay attention, particularly, to these settings:
Printer color space: sRGB (Professional mode only; not pictured)
Output color space: ProPhoto RGB
Monitor color space: ProPhoto RGB

11. In the Filter tab, you may want to check out the results of selecting Infrared clean and Sharpen options.
| |
| No Filters | Light infrared clean, Sharpen checked |
12. Finally, in the Output tab, make sure the options shown below are selected.
Select Fixed dpi under the Printed size drop-down menu
The Printed dpi option will pop up. Enter 300.
Enter in your preferred file name (instead of “myname1”).
Make sure TIFF file is checked. VueScan is also able to create multiple files of different formats from the same scan when in Professional Mode; just check off the file types you need. The Raw file will contain no post-scan processing, so if you are looking to have the actual negative image, select this option. Selecting the output to only Raw is also one way to speed up the batch scanning process, but this may also mean extra digital image processing for you later on.
If you will be working in 16 bit colour with Photoshop, in Professional mode you can select the 48 bit RGB setting under TIFF file type. For B&W film, either 8 bit Gray or 16 bit Gray will suffice.
13. Feel free to go back to any of the tabs and adjust your settings as necessary.
If you are looking for more colour adjustment options, click the More button at the bottom of the VueScan screen, and go through each of the tabs again; Color and Input tabs, especially, will have added functionality in this area. If you are scanning a batch of frames, and want to apply exactly the same options under one of the tabs, across all frames, click More and select the “All frames” checkbox. Be aware that even if you then uncheck this box, the settings will stay on all frames, and any previously-set, frame-specific options under that tab will be lost.
14. Press the Scan button and wait for your images to appear. VueScan may ask you to provide different naming options, depending on how you’ve set up the Output tab. For this reason it is best not to walk away and assume that the entire batch will be finished scanning when you come back.
15. If you need to re-adjust your crop marks and want the marquee box to come up again, switch to the Preview tab located above the scanned image.
16. Scan again as necessary, following steps 4-14 as appropriate.
17. To remove your film strip, go to the Scanner menu and select Eject or press Command-J.
18. Quit the program (VueScan > Quit) when you are done.
