Final Cut Pro does not restrict you to saving your clips and projects to just the user’s Movies folder or an external Mac-formatted hard drive. Thus, it may be more difficult to make sure you gather all your files such that you can move your projects and clips amongst computers (or just have a good backup). In Final Cut Pro (version 10.1 and later), your projects and events are gathered together in a Library. If you plan well, you can ensure that all the clips needed for a project are available in a single library, which you can then copy from your computer to an external drive and vice versa. If your planning was not that great, Final Cut Pro still allows you to consolidate the files for a project in a new library after the fact.
The help files provided with Final Cut Pro (available online or from the Help menu in the app) provide instructions on how to do all of this. Here are key help pages to consider regarding Library management in Final Cut Pro:
- What are libraries?
- Copy a Final Cut Pro project to another Mac
- Copy or move items between libraries
- Copy a library to another Mac or storage device
- Media Management (managing storage locations)
External Drives and Formatting
External drives — whether they are hard drives, solid state drives (SSD), or USB sticks – need to be in one of three formats to be reasonably used with Final Cut Pro:
- APFS (best for SSDs, Apple-only format)
- MacOS Extended (older Mac-only format)
- ExFAT (best for drives that need to be used on Windows as well)
If you have an existing drive in one of these formats, you may use it as is. However, if you are only using your external drive on a Mac, we suggest you follow Apple’s recommendations and reformat your drive as an APFS volume. It will only be viewable on a Mac (unless you buy extra software for your Windows PC), but it will provide the best performance. Note: Reformatting a drive will permanently erase all of the data on it. If you are formatting a drive with existing data on it, copy the data onto another drive (which could be the internal drive of your computer if you have space) before you format the drive. (You can copy it back after you format the drive.)
Note that you should not expect to be able to use a USB Flash Drive/stick for both Final Cut Pro and general Windows tasks, as Windows gets confused with the way the Mac formats USB sticks (even in Windows-friendly formats), hiding all of your data. Conversely, Final Cut Pro can’t use a flash drive formatted in the default way that Windows uses. Performance may also be an issue with USB sticks.
Which Format Do I Have?
To determine which format you have, connect the drive to your Mac. If you are working in the IAML, the storage volume(s) for the external drive should show up on your desktop. (If you are working on a different Mac and you don’t see it show up, open a Finder window and look in the left sidebar under Locations for your drive.)
Select the external volume and press Command-I (or File > Get Info). It will show information about the drive. Check the Format field to determine which format you have.
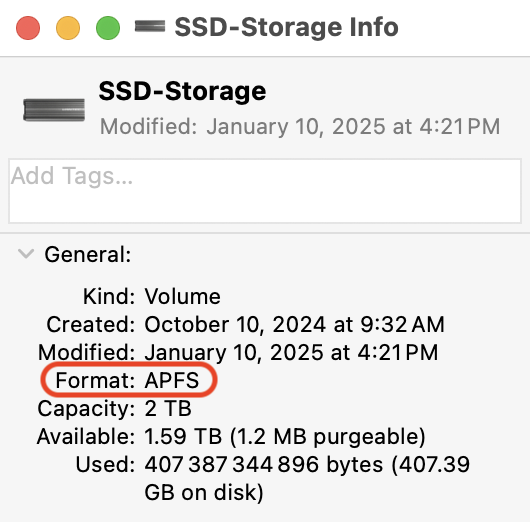
As mentioned earlier, APFS, MacOS Extended, and ExFAT will all work. If the format is Windows NT File System (a.k.a. NTFS), you can read from the disk on macOS but you cannot write to it — you will need to reformat it in order to use it.
How Do I FOrmat The Drive?
You can format any drive using Disk Utility. This is found in the Applications folder inside the Utilities folder. Apple provides instructions on how to format the drive. Select the APFS format if the drive will only be used on a Mac and ExFAT if it will also be used on a Windows PC. Another reminder that formatting the drive erases all of its contents.
